
Have you ever looked at a digital photo and wondered why it looks sharp on your phone but blurry when printed? Or puzzled over why a high-resolution file still looks fuzzy when zoomed in? Chances are, you’re dealing with a classic confusion between DPI and resolution—two concepts that sound similar but play very different roles in digitizing and displaying images.
In this guide, we’ll demystify these terms and help you make smart, preservation-worthy decisions when digitizing your most cherished photos and archival materials.
What’s the Difference Between DPI and Resolution?
Let’s define the terms clearly:
- Resolution refers to the total number of pixels in an image—usually stated as width × height (e.g., 2400×3600).
- DPI stands for dots per inch and relates to how densely those pixels were captured (in scanning) or displayed (in printing).
In scanning, DPI controls how many pixels are created per inch of original material. Higher DPI = more pixels.
In display or print, DPI or PPI (pixels per inch) controls how those pixels are laid out—which affects sharpness and apparent size.
How do I calculate image resolution from a scan?.
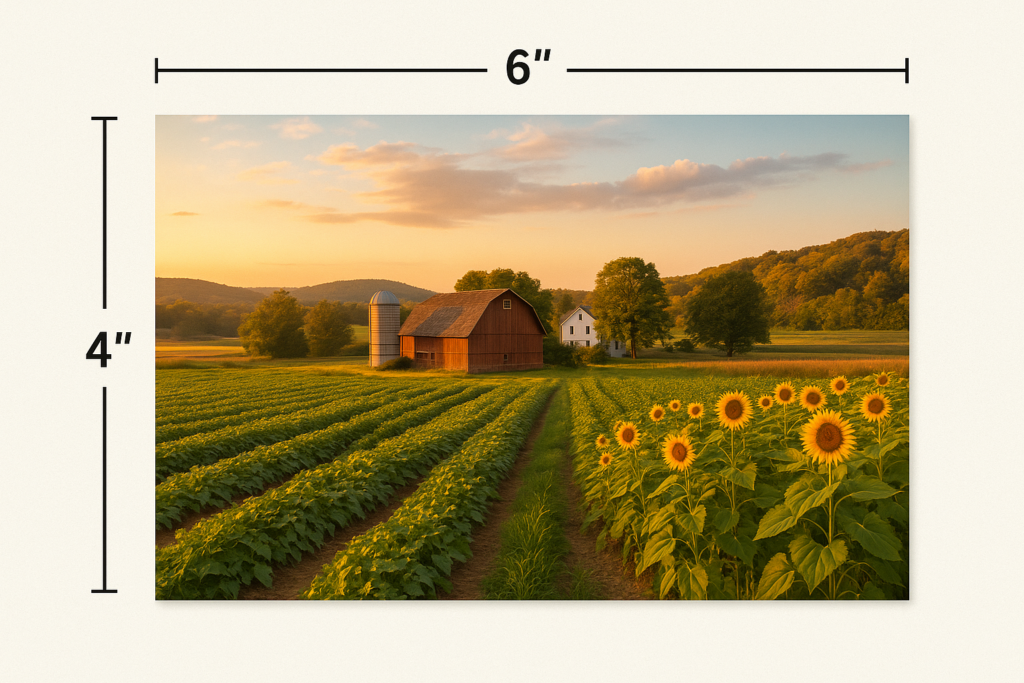
To calculate the resolution of a scanned image, you must know what the physical measurements of the image are, and you must know what the DPI capability of the scanning equipment is. Then, you simply multiply the physical dimensions of the original item (in inches) by the scan’s DPI (dots per inch).
Image Width = 6” x 600 DPI = 3,600
Image Height = 4” x 600 DPI = 2,600
Image Resolution is 3600 x 2600!
If you used the same DPI on a 35mm slide, you will get a resulting image with lower resolution. The standard slide image is 0.94″ × 1.42″. So here is the calculation again:
Image Width = 1.42” x 600 DPI = 852
Image Height = 0.94” x 600 DPI = 564
Image Resolution is 852 x 564
This is much lower, and may be a problem if you intend to use the image in a large print format. This is why most professional scanning of slides or negatives is done with equipment that can scan at a much higher DPI. Because the slide image is so small, it takes a higher DPI to get good resolution when you enlarge the image for use.
This calculation helps you understand how much detail your scan will capture and how large it can be printed or displayed without loss of quality.
Why It Matters for Scanning
The DPI setting you choose when scanning determines how many pixels are created per inch of your original. This is different from changing the DPI in a photo editing program after the scan.
| Original Size | Scan DPI | Output Resolution |
| 4” × 6” photo | 300 DPI (a fairly standard scan DPI in the industry) | 1200×1800 pixels |
| 4” × 6” photo | 600 DPI | 2400×3600 pixels (better) |
| 35mm slide (approx. 0.94” x 1.42”) | 3000 DPI | ~4000×6000 pixels |
More DPI during scanning means more total pixels—and more detail preserved.
So Why Does DPI Show Up in File Properties?
Image files sometimes include DPI metadata (e.g., 72 DPI, 300 DPI), but this is often just a hint for printing software. It doesn’t change the actual pixel data. A 2400×3600 image is still 2400×3600 regardless of whether it says 72 or 300 DPI in its metadata.
Changing this value in Photoshop or Preview doesn’t affect the image quality—it only changes how large it would print at that setting.
When Does DPI Actually Matter?
| Use Case | What Matters Most |
| Scanning | DPI during scan = pixel count |
| Display on screen | Pixel dimensions (resolution) |
| Printing | DPI + resolution |
| Web publishing | Resolution only (DPI often ignored) |
For printing, DPI matters a lot. For web and screen, resolution (in pixels) is the key metric.
How to Choose the Right Scan Settings
Use this cheat sheet to determine the best DPI for your project:
| Original Format | Recommended DPI | Notes |
| Photo prints (4×6) | 600 DPI | Allows for cropping and enlarging |
| Wallet-sized photos | 1200 DPI | Small originals = scan higher |
| Slides/Negatives | 3000–6000 DPI | Needed to capture tiny details |
| Documents | 300–600 DPI | For readability; higher for fine print or stamps |
Higher DPI is most important when:
- You’re scanning small originals (slides, wallets).
- You may want to print it larger at a later time.
- You’re preserving images for future tech (e.g., AI enhancement).
What If I Already Scanned at a Lower DPI?
You can’t “rescue” a low-DPI scan by upscaling it in software. You’ll only add more pixels, not more detail. If the image is important—rescan at a higher DPI.
This is especially true if:
- The scan is your only digital backup
- You plan to restore or print it
- The original is fragile or deteriorating
Bonus Tip: Don’t Let File Size Scare You
Higher-DPI scans produce bigger files. A 600 DPI TIFF may be 25MB+, compared to a 300 DPI JPEG at 3MB. But the benefit—futureproof quality—is well worth the storage. You can always export smaller versions later.
Final Takeaway: Think Before You Scan
DPI and resolution work hand in hand. DPI controls how many pixels your scan contains. Resolution (in pixels) determines how useful, flexible, and beautiful that digital file becomes.
If you’re scanning old family photos, slides, or documents, don’t settle for defaults. Choose settings based on your future goals, not just your current device.And if you’re overwhelmed by settings, formats, or equipment—Scanthology is here to help. We specialize in high-resolution, archival-grade digitization tailored to each photo, slide, or negative. Your digital memories will be sharp, detailed, and built to last for generations.